


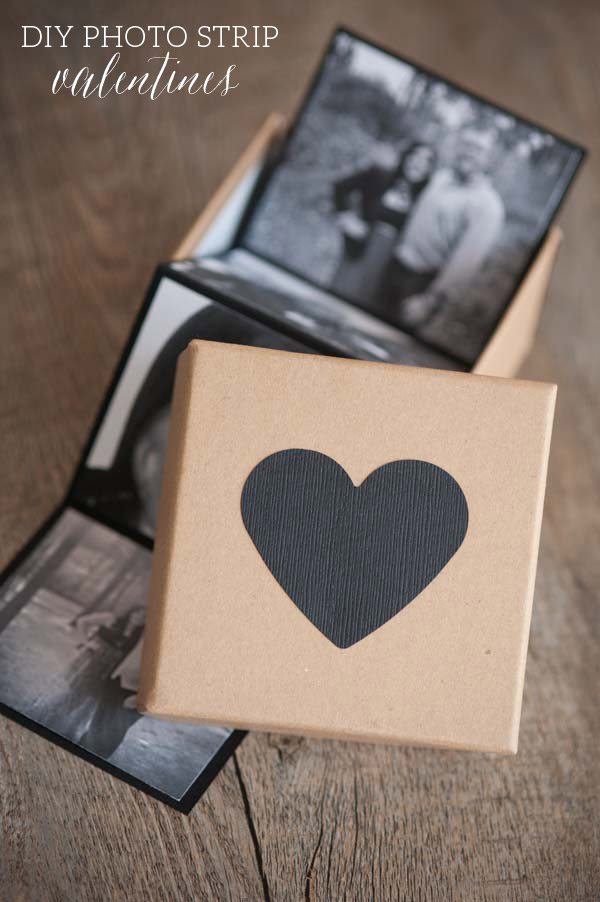
With Valentine’s Day quickly approaching, let’s chat about a sweet little homemade Valentine idea, shall we? Inspired by mine and B’s shared love for vintage photo booths that spit out those perfect black and white photo strips, this charming Valentine’s Day gift combines a handful of your favorite recents snapshots with a box of chocolates in the sweetest little package. While these would be perfect for anyone you want to show a little love, I personally think they’re particularly great for dudes. Because dudes are far more sentimental than they’ll ever admit, but we ladies can’t default to having a dozen roses delivered and calling it good. Am I right?
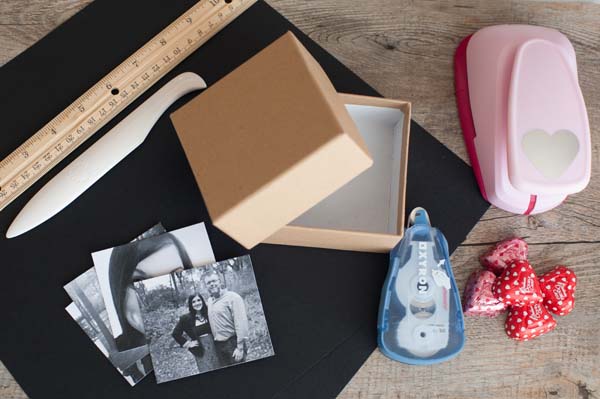

- Mini kraft gift boxes
- Bone folder
- Black card stock
- Printed photos
- Double-sided adhesive
- Ruler
- Chocolates or sweets
- Heart shaped paper punch
- Scissors (or kraft knife and metal straight edge)


Begin by measuring the width of your box and determining how wide you’d like your photo strip to end up when finished. My box was right around 3.5″ wide so I opted for a photo strip that was 3″ across. I used 12×12 black card stock, but you can use whatever size you’d like, keeping in mind that the length of your card stock will determine the length of your photo strip and therefore how many photos you can fit.


Next up, you’re going to create score marks along the strip of card stock to correspond to each photo. To do this I simply measured and made tick marks, dividing the strip into four equal sections and then created a score mark using a bone folder and a straight edge. Technically you can do this without a bone folder, but I suggest using one because they’re inexpensive and they help you make nice clean folds in the paper. Once scored, simply use the back flat edge of the bone folder to create the accordion folds in your strip of card stock, alternating the direction of the fold as you.


Once your card stock is cut, scored and folded, it’s time to attach the photos! I printed mine at home on photo paper, but you could also have them printed locally or at a print shop if you prefer. I trimmed them down to be slightly smaller than the card stock to allow for a black border around each. Figure out what order you’d like the photos to appear in and then attach them to the card stock using an acid-free double-side adhesive. I prefer my trusty little Xyron for this, but you could also use double-stick tape.


Now that your photo strip is complete, use a paper punch to punch a heart out of the same black card stock and adhere it to the top of the box with double-sided adhesive. You could switch this up with a different color of card stock or paper if you prefer, but I’m a sucker for the combination of black and kraft and I love how it kept it from looking too girly.


All that is left is to fill your box with chocolates or candies! I went with heart-shaped chocolates because I like how they tied in with the heart on the top of the box, but you should go with whatever treat your honey loves best. Fold the photo strip into the box, place the lid on top and voila! You’re all done. That was easy, wasn’t it? Definitely a perfect little gift to give on Valentine’s Day and one that’s easy and inexpensive to craft up to boot. Love that!


![]()
[Design + styling by Cyd Converse for The Sweetest Occasion. | Photos by Alice G. Patterson.]
Sources –
Mini gift boxes from Target
Card stock, bone folder + paper punch from Michaels
Nail polish is Ocean by Revlon
The fine print: Please link with love! As with all of our posts, DIY projects featured on The Sweetest Occasion may not be copied, distributed or reproduced without permission. Love and links are always appreciated! If you’d like to share this post, please link to this post directly for the DIY tutorial and do not include the instructions in your own post. Thanks so much! xoxo


 Back to Top
What a great idea and gift!! Thanks so much for sharing! Wish I had seen this before Valentine’s Day! lol
What a cute idea! This made me realize that I need to take more pictures of my boyfriend and I together. Maybe next year right? PS these photos are beautiful!
Thanks, Rachel! I had a lot of fun with this one :-)
Such a cute gift. Totally adorable. <3 <3
Adorable! Perfect little gift.
These are the cutest!! I LOVE!
what a fun, hand made gift!
Super cute!! I love the way this turned out..
Thank you, Ryan! xoxo
I LOVE this idea! It’s simple yet meaningful…and it isn’t covered in pink and red. Perfect gift idea for a guy. I’m definitely doing this for my fiance this year. Thanks for sharing!
Thank you, Amanda! I’d love to see how yours turn out! xoxo