I get a lot of questions about how to start a blog and, perhaps even more frequently, about how to grow your blog once you’re up and running. Here I’ve collected a ton of resources for you, paired with my personal tips and tricks for best practices to help you get started or to help you build upon what you’ve already begun. We’re talking about some of the really important (but entirely unglamorous) tech things and also some of the more fun and pretty things, too. I hope this is helpful for you and gives you a little insight as to how you can take your passion and turn it into a blog that’s unique and successful. For more about how I got where I am, you can see how The Sweetest Occasion has evolved over time and also read more about how I transitioned my career to blogging full-time.
Note: This page contains affiliate links, which means I will earn a commission if you make a purchase through those links. This is one way that I earn a living and fund the projects, posts, tutorials and recipes I share here daily. Also, these are all companies, products and/or services I trust and would recommend even without that commission. So, basically, thank you for helping support The Sweetest Occasion! If you find this information helpful, I invite you to please pin the image above on Pinterest, to help spread the word to others. Thank you! xoxo
First of all, let’s kick things off by talking about the obvious. Why me? As in, why should you take advice from me? I will say that while I am constantly learning and trying to sharpen my skills and grow to be better at what I do, I can pretty safely say at this point that I would definitely qualify as a blogging expert, at least within the lifestyle niche. I have been blogging personally since the early 2000s and started The Sweetest Occasion in 2008. Since 2011 blogging has been my full-time job, which means for nearly four years this site has been putting a roof over my head, making the student loan payments and keeping the landlord happy. All of the tips and steps I’m about to share are all things I wish I had known when I first started blogging, which means you get to skip over all the trial and error and jump right to the good stuff. So let’s get started!
I started out blogging with a crappy little blog on Blogger. It was fine, it worked out ok, but I largely credit that to the fact that I realized quickly I should have my own custom domain name and quickly switched gears and registered thesweetestoccasion.com. You aren’t going to do what I did though. You’re going to start things off by picking and registering a domain name right out of the gate. (In a nutshell, this gives your site a lot more clout and establishes brand recognition early on, which is a definite bonus.) So, how do you register a domain name? It’s easier than you think! First, come up with a great name for your blog and from there you can determine what your domain name should ideally be. Then, pop over to Bluehost and do a search to see if your domain name is available.
Enter your desired domain name into the box as shown above and then click next. If it’s already taken you may have to come up with an alternative, but hopefully your first pick is available and you’re on your way! From there you can follow the screen prompts to get your domain name fully registered as yours. You’re almost ready to roll!
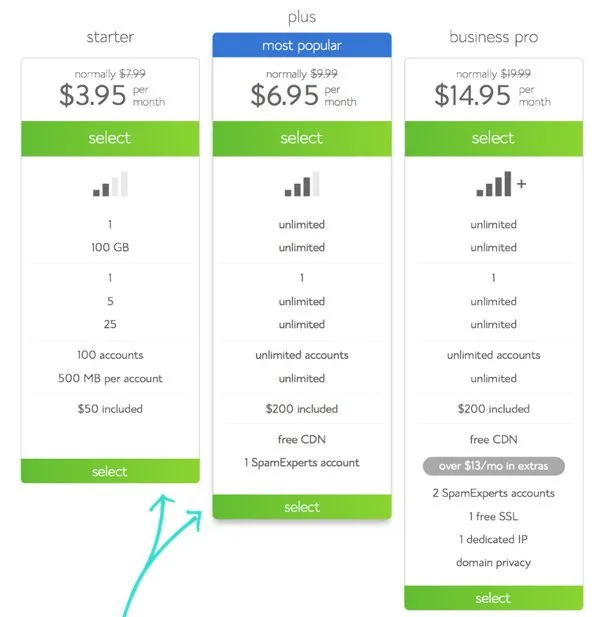
If your domain name is your address, hosting is basically the apartment that you’re renting on the internet where you’ll showcase your blog. Bluehost offers incredibly affordable hosting packages for new bloggers and they’ll even throw in your domain name registration free of charge if you opt to host with them! Their starter plan is by far the least expensive and while you do have to pre-pay the full year in one upfront fee, it will save you some dollars and I’m all about saving dollars wherever possible. Their next plan up is also an incredible value and gives you a lot of extra features for just a few more dollars a month.
When you get to the screen where you’re confirming your hosting plan preferences, make sure you’ve selected your preferred hosting plan in the Account Plan drop down menu. Then, you should definitely opt-in to the Domain Privacy Protection, because that is going to keep all of your personal information private. Why is this important? In a nutshell, if you don’t choose the privacy option, anyone who chooses to look it up will be able to see that you are the registered owner of your domain name. And, friends, as much as we love the interent it can be a weird place out there so just say yes to keeping your information private.
Once you’ve registered your domain name and gotten your hosting plan all set up with Bluehost, it’s time to install WordPress! So let’s back it up for just a moment. What is WordPress? Essentially it’s the software that is going to power your blog. Yes, there are other options. You’re welcome to check them out, but I will tell you from first hand experience that WordPress is the way you want to go. It’s powerful, adaptable and it will grow with you as your blog grows. It’s widely considered the industry standard for blogging and is increasingly being used by large, mainstream websites, too. WordPress is your new best friend. Shake hands and say hi because the two of you are going to have a long awesome relationship.
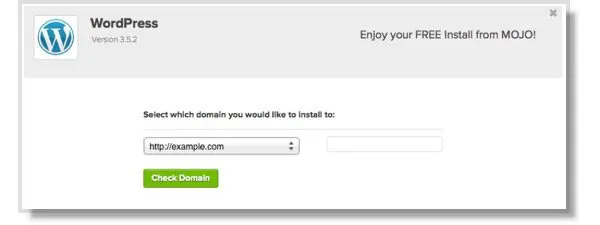
Login to your Bluehost account and find the Website Builders section. From there, you’ll click on the WordPress logo and on the next page click the Install button under the Do it Yourself section.
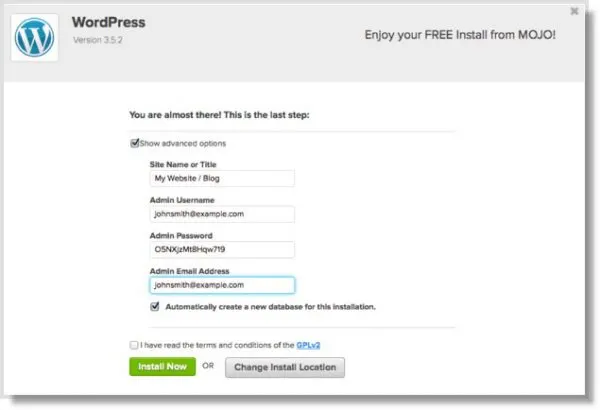
Click on the Check Domain button. Check the terms and conditions box and then select Install Now. Yes! This is getting so excited. Are you shocked at how easy it was? Good. Because it’s not getting any more difficult, I promise.
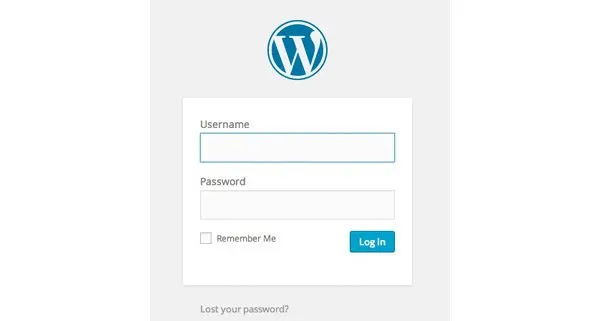
Next, you’ll see a message letting you know that your installation is complete. At that point, click on View Credentials and be sure to write down your admin URL, username, and password. You’ll need this information to log into your blog for the first time, but you can (and should) change all of that information later.
Visit your admin url and enter the provided username and password and at this point you’re officially logged in and you’ve already done a bunch of the heavy lifting required to get you up and blogging!
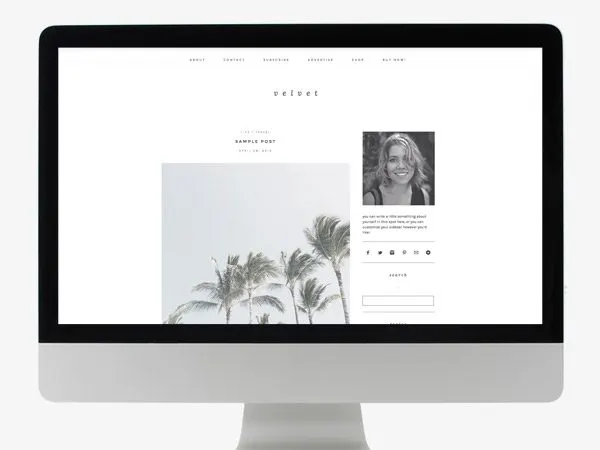
Now it’s time to make your blog pretty! To do this, you’ll need to choose a WordPress theme. A theme is basically the accessories that make your blog look visually appealing and take it from a white t-shirt and jeans to a super stylish outfit. Pretty WordPress themes can be a little tricky to find, so I’ve collected some options for you to help make it a little easier. The Sweetest Occasion actually runs on a custom theme that I designed and had coded just for me, but that’s a ton of work and way more than you should even consider taking on as you’re getting started.
- I love the themes from Blogzilla, like the one above. They are clean, simple and really let your content shine. They share loads of tips on their site for installing their themes, which are sold at a very affordable price. For an additional fee they can even install your chosen theme for you. Easy peasy!
- Genesis is a very popular and widely praised framework on which lots of awesome themes are built. It has loads of snazzy features that will make your site super slick on the backend without you having to figure out all the tech stuff right away. (Confession time! A lot of the tech stuff still confuses me, and it’s totally ok.) StudioPress has tons of good looking themes built on Genesis and they’re kind of the go-to destination for great WordPress themes that are great for design and lifestyle bloggers.
- Of the themes available from StudioPress that I think are particularly snazzy, I’m the biggest fan of the Foodie Pro theme. It’s specifically designed for food bloggers, but it’s pretty great for lifestyle bloggers, too. It has all the good behind-the-scenes stuff going on that you want and it looks really good.
Now that your blog is up and running, looking pretty and you’re filling it up with loads of great content, it’s time to get social! You’re going to want to register social media accounts on all of the major platforms to help you promote your blog. Namely, those are Facebook, Pinterest, Instagram and Twitter. Even if you don’t use all of them right away, this will allow you to reserve those profiles so no one else has the opportunity to snatch them up. If all of this seems a little overwhelming, choose one or two as your primary focus to begin and start building an audience by sharing photos, links, images and articles that inspire you. Remember to respond to comments, ask questions and generally connect with your followers, because that’s the quickest way to build a social media following. Bonus! If they love you on Facebook, chances are they’ll pay a visit to your blog and fall in love with you there, too. You can follow me at my various accounts by clicking the respective links above if you’d like to stalk how I’m doing it! Social media is a huge part of how I promote myself and the work I’m doing and while I don’t want to write a whole book about it here (because I absolutely could), let me know if you have any specific questions and I will try to help.
So many readers cite that my photography (and/or the photos I share from other photographers) is a huge draw for them. I will admit this is entirely humbling to me as I personally have so much I want to improve about my photography work, but let this be a lesson to you – images are king when it comes to growing a blog! To answer some frequently asked questions regarding my camera and lenses, I’m sharing a list of my photography equipment here. I will also provide some options and ideas for less expensive alternatives as you’re getting started, too!
- I shoot with the Canon EOS 6D and I love this camera. I did not purchase it with the kit lens.
- The Canon EF 50mm f/1.4 is my go-to lens and is what I use for 90% of the photos on the blog. It’s an amazing lens for the price.
- My second most used lens is the Canon EF 35mm f/2
- If you’re just starting out, consider the Canon Rebel T5i or the Nikon D5200
- A great starter lens for shooting things like DIYs and recipes is the Canon EF 50mm f/1.8. There is so much bang for your buck here, friends! (Sadly, I’m not super familiar with Nikon lenses so I can’t make any specific recommendations there.)
- The lens I do not own, but would like to pick up and try out sometime soon is the Canon EF 85mm f/1.8
- While I really think you ultimately need to invest in a DSLR and learn how to use it as well as you can, if your budget really can’t get you there just now my recommendation for a seriously amazing point and shoot camera is the Canon PowerShot S120. I own an earlier version and I love it still. It goes with me when I’m in situations like conferences or trade shows where the lighting is crazy or where carrying a larger camera is just a pain.
- White foam core is a great place to start when thinking about either (a) a nice white surface to use a background or (b) reflecting light. You can buy it inexpensively at craft stores and it’s a really great “tool” to have around as you’re getting started shooting content for your blog.
- White seamless background paper is also awesome. It’s another affordable option for you giving you that often sought after white background that’s, well, seamless.
- A floral frog (or a few) is another great thing to keep on hand so you can stick a piece of foam core onto it vertically to act as a reflector and it will stand up tall without crashing onto whatever masterpiece it is that you’re shooting.
A note on Canon vs. Nikon and choosing a camera in general. I personally shoot Canon but would also happily own a Nikon – both are rockstar options and as you invest in lenses and build up an arsenal, those lenses will stay with you as you upgrade the camera body over the years. Just keep in mind that Canon lenses only work with Canon bodies and vice versa with Nikon. So with that said, if you can, try to check the cameras out in person so you can see which you prefer or order from a place like Amazon that generally has competitive pricing, super quick shipping and a great return policy.
Understanding that some of the things I discussed above might be a little bit confusing to those of you who are complete photography novices, I’ve put together of great resources to help you become more familiar and comfortable with taking photos that look great.
- Nicole’s Classes offers amazing classes for beginning photographers, those looking to sharpen their skills and get even better. Alternately or in addition to a class, Nicole’s Photo 101 book is an awesome resource.
- Lindsay at Pinch of Yum also offers a great ebook, Tasty Food Photography, that’s specifically designed to help you take great photos of food and recipes, but it’s relevant for anything you’d consider “tabletop” photography. Think DIY tutorials, floral arrangements and more.
- Plate to Pixel by all-star blogger Helen Dujardin is a book I own and still reference on occasion for inspiration and tips. Again, it’s geared toward food photography specifically, but I find it useful for so much more than that as so many of the tips apply to other areas.
- Skillshare offers a ton of classes geared toward creative professionals, including several different photography classes. Their prices are excellent and the courses are self-paced so you can fit them into your schedule however it works best for you.
- For those times when you need to polish a turd (which is an entirely uncouth way of saying that you need to fix a photo that just went wrong), check out the Foto Rx actions for Adobe Photoshop. This newly released bundle of actions is specifically designed to rescue photos you would otherwise need to trash. While I haven’t tried them yet myself, they were developed by two ladies (Tristan and Michelle of Besotted) who are excellent photographers and who really know their stuff so it’s a safe bet that these actions rock.
So that we’re all perfectly clear, I could talk for days about blogging and there is no end to things that you’ll learn as you go along. But that’s the great part! You don’t have to know it all to get started, which is why you should absolutely get started today. I remember writing my first post like it was yesterday and it was the coolest thing ever. Now, thousands of posts and millions of readers later, it’s even cooler. Here are some additional resources that I believe will be helpful and inspirational as you begin.
- Alt Summit blog
- Skillshare
- Design + Blogging Resources (This is a Pinterest board where I pin things that I think might either teach me something or might be useful to my followers! I update it regularly as I discover new resources.)
Friends, I get it. This was information overload. So make sure to pin this page so you can visit it as needed and don’t feel pressure to absorb it all at once. I will be updating it on occasion as I think of new tips and tricks to share with you and/or as I make changes in what I’m doing that I think may be of benefit to you. If you still have questions, please email me at [email protected] and I’d love to try and help out! I’m passionate about blogging and I want to share that passion with you. Thank you so much for all of your love and support – you guys rock!

